Before you start
Some of the pages within Jobtrain require pop-ups to be used. To allow pop-ups, right click your mouse on the message that is displayed on the top left of the page. Left click your mouse on the message ‘Always Allow Pop-ups from this site’.
In some versions of Internet Explorer, pop-ups can also be automatically minimised into the Start toolbar, giving the impression they were either blocked or that they didn't open.
Look for the blue ‘e’ icon on your toolbar (usually at the bottom of your screen) and you will find the pop-up window(s) stacked behind it. If a pop up appears to be missing, look behind your browser icon in the toolbar as it may have dropped to the bottom of the page.
Caching
Internet browsers will save web pages you have visited in a file on your hard drive in order to increase the speed at which your browser opens that same site again – a process called caching.
We recommend either checking your browser settings and setting them to avoid caching or regularly clearing the cache. At any point in time the cache can be cleared manually by pressing CTRL + F5 on your keyboard when using Internet Explorer or Google Chrome on a laptop or PC.
For guidance on cache setting and clearing the cache on different browsers and devices please check the relevant suppliers website or online blogs.
Accessing Jobtrain
Go to your designated Jobtrain link and type in your Username and Password in the fields provided and click login.
If you are unsure of your Jobtrain URL (link), username or password please contact your HR/Recruitment team and they will provide you with these details.

Your Homepage
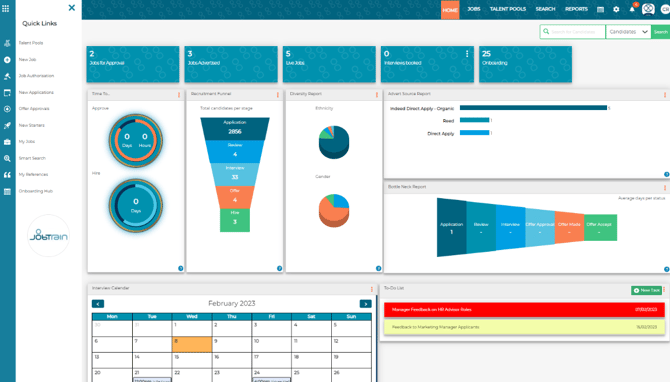
Your Homepage provides bespoke information on both vacancies and candidates and what is displayed here will be dependent on your security access.
Recruitment Funnel report:
This report displays the count of candidates who applied within the last 7, 30, or 90 days, categorised by their current statuses.
Bottle Neck Report:
The Bottle neck report calculates the average time (in days) candidates have stayed in the selected statuses during the last 7, 30, or 90 days.
Homepage: Interview Calendar
The Interview Calendar will show the dates and times of booked interviews for candidates and jobs you have access to.
This will default to showing both the calendar view and the list of booked interviews below. If you would like to just see the list of booked interviews you can select your preferred view using the three dots in the top right-hand corner of the tile.
|
Calendar and List View: |
List View: |
|
|
|
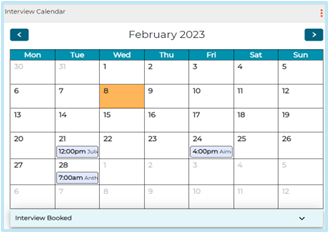
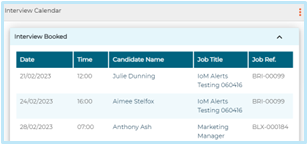
You can access the candidate’s record and the job from the interview calendar by clicking on the candidate’s name or job title.
Homepage: To-Do List
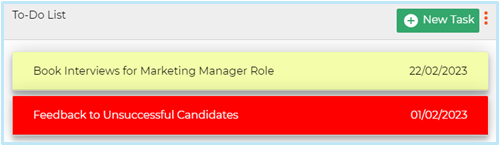
Here you can add tasks to your To-Do List and set a completion date. Once the date has passed the note will change to Red to indicate the task is outstanding.
Navigation
The top menu allows you to navigate the full site, to access Job Information, Talent Communities and Reports.
A Quick Links menu is available on the left-hand side for quick access to key areas such as Approvals information and the New Starters dashboard.
Adding a new job
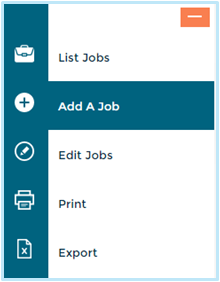 Click on the Jobs tab at the top of the page.
Select Add A Job in the left-hand menu.
Choose from up to 3 options to create your new job:
- Copy from a template
- Copy an existing job
- Create a new job
- Pre-Assessment Forms (Killer Questions)
These are designed to quickly highlight candidates who do not meet the essential criteria for the role. They appear at the very beginning of the form after the candidate has registered their details. They can be set up to auto reject any candidate that doesn’t meet the minimum pass mark. - Assessment Forms
- 2nd Stage Application
- Assessment form to 2nd stage application
- Initial Sift/Telephone Screening Forms
These are online forms for hiring managers or recruiters to capture telephone screening information or complete manual shortlisting. - To select a different, job-specific acknowledgment email click in the field against the Acknowledgement Email section and begin typing the name of the email and select your chosen template.
- You also have the option to include a Feedback Email if you would like to collect feedback on your recruitment process. To do so, simply select the appropriate email template and designate which candidate status will activate the feedback email. This will ensure that the email is automatically sent once candidates reach this status.
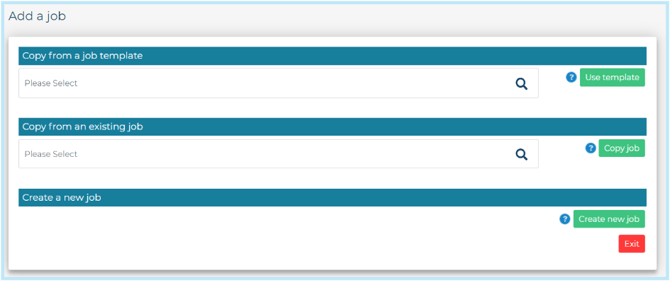
If you are using the copy job option, you will be able to see the location of the job you are copying from alongside the job reference number and job title.
Depending on your system setup and access you may be able to see all or just some of these options.
Details
When you’re creating a new job, you will see a blank Details page. If you are using a template or copying from an existing role, several fields in the Details page will have already been completed. Check any existing information and complete other information as required. All mandatory fields are highlighted in red.
As this page is created with each client's requirements, the information on this screen will differ for each client.
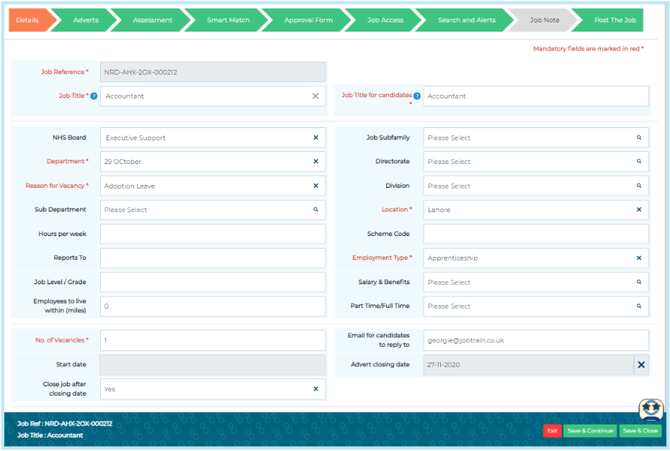
If you have entered an invalid email address in the Email for Candidates to reply to field, you will get an error message prompting you to add a valid email address.
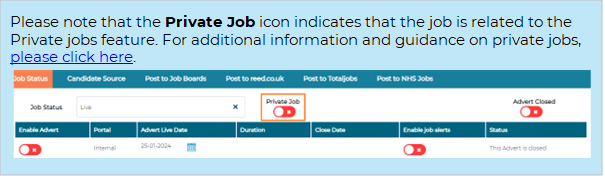
Did you know? Upon saving the Job Details, any common fields (Salary Band, Job Region, Department, Location, School Location, School Subject) will auto-populate in Search & Alerts criteria.
Save and continue to progress to the next page.
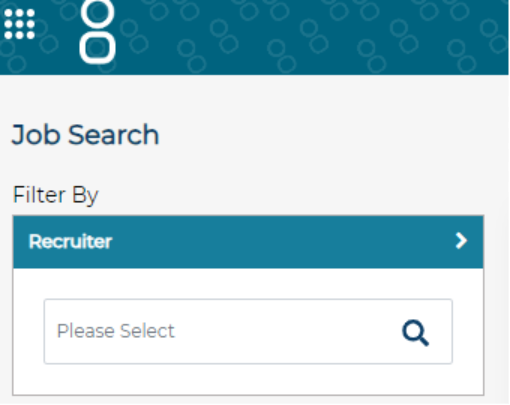
A field titled Recruiter is available for use on the Job Details page that pulls through system users.

This is activated by contacting our support team - contact them here.
Within each system user profile, there is an additional toggle to determine if they are a Recruiter.

If this is enabled, the system user will automatically be added to list of Recruiters on the Job Details page.

This field is available to add as a column on the List of Jobs page. This can also be activated by Jobtrain Support.
This field can also be filtered on when using the Search Jobs functionality:
Adverts
Firstly, select where you would like the job to be advertised by using the toggles displayed at the top of the page.

This section allows you to customise the advert displayed to candidates on the sites chosen above.
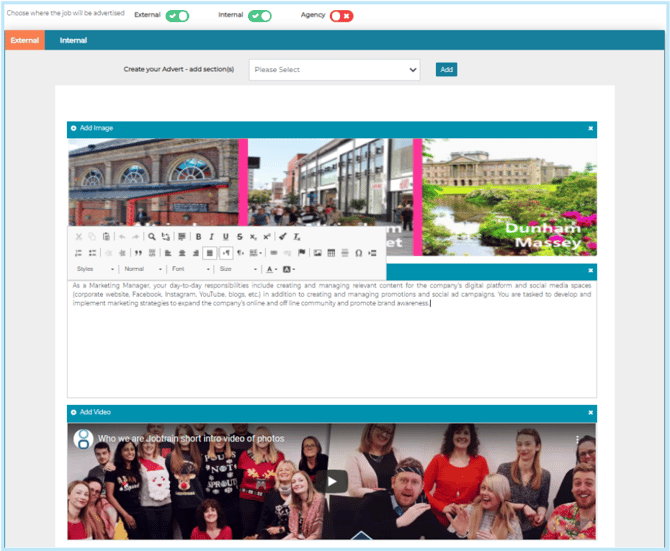
To add advert content, either type in the required wording or click the plus icon on each 'Add Text' box to select advert copy from your Media Library. Changes can be made using the formatting tools at the top of the box which is visible once you click into the text box.
As with any wording entered into Jobtrain, we recommend copy content into Notepad before copying it into Jobtrain. This ensures all hidden formatting is removed.
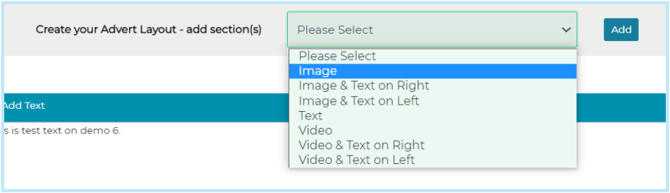
To tailor your advert template, select options from the dropdown menu to add sections (enabling additional images, videos or extra text).
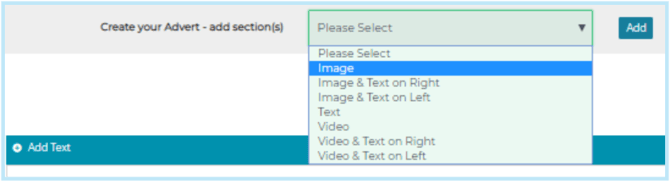
Choose the required section and click Add. Sections can be removed from your advert by clicking the X in the top right-hand corner.
The section display order can also be changed by dragging and dropping each section.
Adding Images & Videos
Images or videos can also be added to adverts from your Media Library.
To do so, select the relevant item you wish to add from the Create your Advert Layout options and then Add.
A placeholder box will then be added into the advert copy page.
To add in an image / video from the media library select Add Image or Add Video in each relevant section.
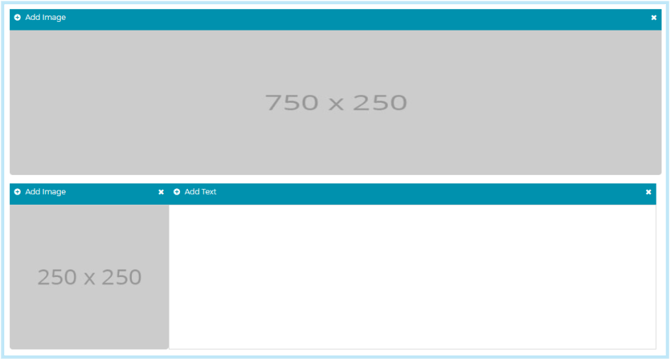
When adding an image from the image library, you will only be presented with a list of images that match the size of the image placeholder you have selected (e.g. 250 x 250)
If you cannot see the image, you are looking for it is likely that is a different size to the image placeholder you have selected.
For placeholders that display 750 x 250, images with the dimensions of 750 x 250 or 1100 x 250 will be presented when selecting Add Image.
NB: You can check what your final advert looks like by clicking at the bottom of the page.

If you see 'Preview Advert' only, it means the job is approved and you cannot make changes after approval due to your user permissions.
Different versions of the advert can also be added on your external, internal and agency sites as required. Simply click on the relevant tab and complete the content as above.
Copy from External / Internal Advert
If you only need to make minor changes to the external advert copy for the internal or agency adverts, click the Copy from External Advert. This copies the content for you to amend accordingly.
If these tabs are left blank, Jobtrain will automatically use the external advert copy on all sites you are advertising on.

Similarly, If you only need to make minor changes to the internal advert copy for the external adverts, you can click the Copy from Internal Advert. This copies the content for you to amend accordingly.

Clients can raise a request with the Jobtrain Support team who will activate this feature for them.
Please note: Copy from Internal Advert is an optional feature, please raise a request with the Jobtrain Support team who will activate this feature for you if it is not already present.
Social Media Attention Grabber
Add a few lines of text here to capture candidates’ interest in the position. This will be displayed on any jobs shared to social media.
Supporting documents
Include any supporting documents you would like candidates to have access to as part of the advert, i.e. job descriptions, person specifications, interview formats, etc. Documents can either be added from your Document Library or your PC.
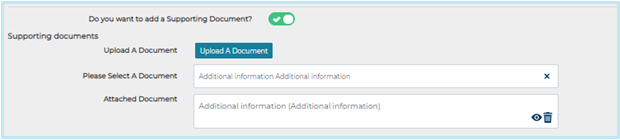
Uploading a new document to this section will automatically add it to your document library. Therefore, we recommend that you check the Jobtrain document library before uploading a new document from your PC to reduce the risk of storing duplicate records in your Jobtrain document library.
Save and continue to progress to the next page.
Assessment
This section is where you assign internal, external and agency application forms as well as attach any required assessment or screening forms.
Application Forms
Select the relevant application form from the dropdown for each site that you are advertising to (external, internal or agency).

If you tick the box to advertise on a candidate site that does not have an application form attached to it, a warning message will be displayed when you click Save & Continue on this page.
We recommend clients to add an internal and external application form to all roles - this ensures the capture of those candidates' details that accidentally apply as the incorrect status (i.e. external candidates applying as internal candidates)
Assessment Forms and Screening
There are a number of additional forms, including 2nd stage application forms you can attach to a role from the dropdown menus – as below:
Please note: The Assessment Form Type determines the displayed options for each section. If you don't see the right form in the dropdown, check the selected form type in Settings > Assessment Forms.
If a form doesn't have a 'Form Type' assigned (which could be the case as this feature was introduced in October 2023), those forms will still be visible and selectable in all the options within the 'Assessment' section when your adding or editing a job.
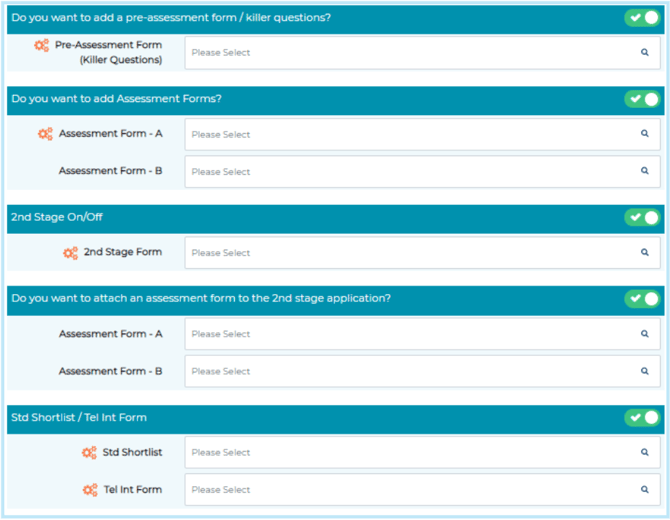
- Pre-Assessment Forms (Killer Questions)
- Assessment Forms
- 2nd Stage Application
Can be used to gather information on how well a candidate matches the desirable criteria for the role. This will appear towards the end of the application form before the candidate submits their application.
If you have never used 2 stage applications before there are a few setup steps that need completing before implementing this feature. Please speak to our support team or your Continuous Improvement Consultant to discus this in more detail.
- Assessment form to 2nd stage application
- Initial Sift/Telephone Screening Forms
These are online forms for hiring managers or recruiters to capture telephone screening information or complete manual shortlisting.
The labels of the Initial Sift / Telephone Screening forms may vary per client as the names can be changed but the functionality still works the same.
Acknowledgement email
This section allows you to amend default emails for a specific role. This is useful when the job requires a different kind of communication (for example apprenticeship roles).
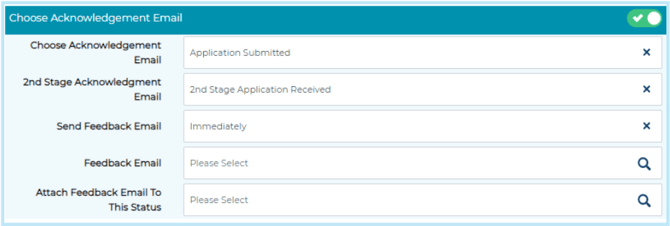
- To select a different, job-specific acknowledgment email click in the field against the Acknowledgement Email section and begin typing the name of the email and select your chosen template.
- You also have the option to include a Feedback Email if you would like to collect feedback on your recruitment process. To do so, simply select the appropriate email template and designate which candidate status will activate the feedback email. This will ensure that the email is automatically sent once candidates reach this status.
Agency Acknowledgment Emails
On the Agency Assessment section there is an additional button in this section entitled CC to Agency.
This needs to be enabled if you wish for the Agency to receive a copy of the acknowledgement email.

Forward Application
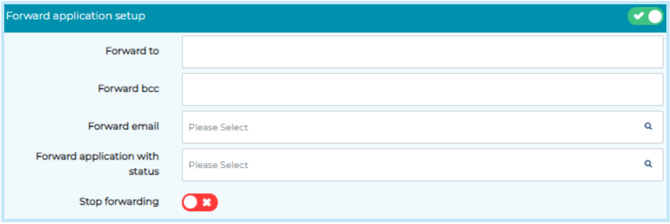
Application information can also be auto forwarded to other people. Expand the Forward Application setup section, enter in the person’s email address and select a status that the candidate needs to be at in order for the email to be sent out. Once a candidate applies for the role and is at the specified status, their application will be auto forwarded onto the recipient.
Panel Shortlisting
This section is where you would attach a panel shortlisting form, allowing multiple shortlisters to complete the same form and you can compare scores. If you haven’t used the panel shortlisting feature before please refer to our Shortlisting Forms client guide.

Approval Form
If you have the additional Vacancy Approval feature, this section allows the job creator to complete additional details for the recruitment authorisation process. When the job authorisation process is started, a copy of the approval form is sent to the designated vacancy approvers as an email attachment.
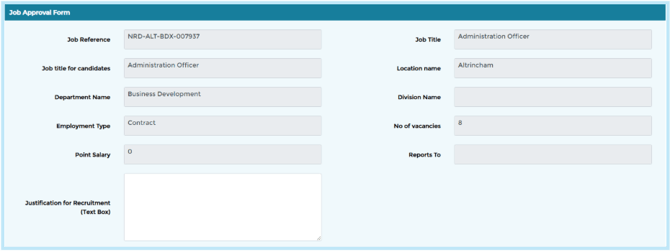
When you click on this form, you will notice that some details have already been entered - this information has been brought across from the Job Details page. Enter in all other required information (fields in red are mandatory), then press Save and Continue.
As this form is created with each clients requirements, the information on this screen will differ for each client.
Job Approval Workflow
Select the relevant approval template from the Job Approval Workflow section dropdown.
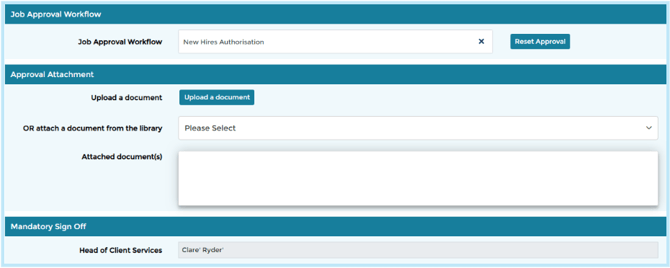
Once selected, the screen will refresh, and a list of approvers will appear at the bottom of the screen under Mandatory Sign Off.
If you choose the wrong template, click Reset Approval and select a different template using steps above.
Add any supporting documents to send to approvers under the Approval Attachment section (either from your PC or the Document Library).
Uploading a new document to this section will automatically add this to your Document Library. We recommend clients check their document library before uploading a new document from your PC to reduce the risk of storing duplicate records in your Jobtrain document library.
You then have 2 options:
- Save and Start Approval: This will start the Job approval process straight away and you will get a message onscreen to advise the approval process has successfully started. To move onto the next page of the add a job process you will then need to click Save & Continue.

- Save & Continue: This will progress you to the next page of the add a job process but will not start the approval process at this stage. You can start the approval process later on in the process by clicking Save on the Post The Job page.
You must select a Job Approval Workflow in order to be able to click Save and Start Approval button. If a Job Approval Workflow has not been selected this button will be greyed out.
Job Access
Define who will have access to this job in this section.
From each dropdown, select the relevant users within the following sections (if required):
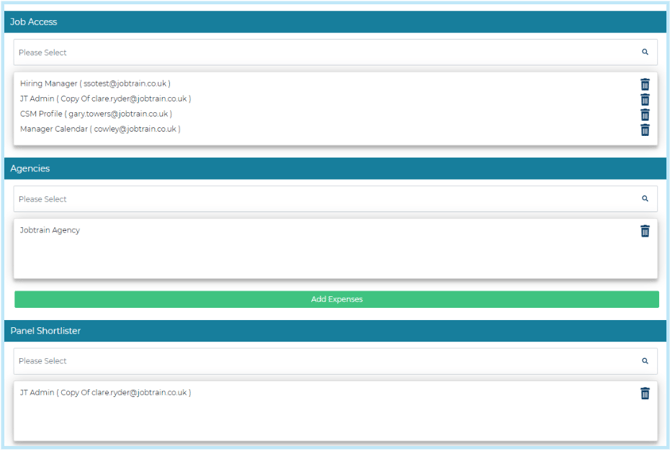
- Job Access: Internal system user
- Agencies: Only applicable if you have chosen to release to the agency portal. If so here you would select the relevant agencies you would like to invite to submit candidates for the role.
- Shortlister: Only applicable if you are utilising panel shortlisting for this role. If so, add in the names of the shortlisters here.
Interview Details
This information will be used when candidates are invited to interview.
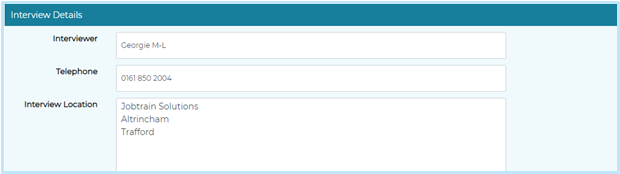
This section is only used for standard interview functionality. If you have the self-service interviewing feature, please follow the user guide for this additional module.
Add the interviewer’s name, telephone number and location in the free-text boxes. When you invite a candidate to interview, the interview template email can automatically populate using this information.
Press Save & Continue.
Search and Alerts
This page allows you to determine the search criteria for this role. It is used when candidates search for jobs as well as defining which Job alerts are sent out to candidates.
Any common fields from the job details page (Salary Band, Job Region, Department, Location, School Location, School Subject) will auto-populate in this section to save time. You can refine or adjust these options as required by adding and removing options accordingly.
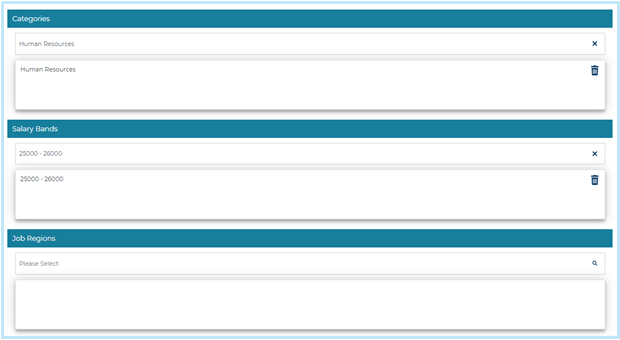
As this section is defined in line with each clients requirements, the information on this screen may differ in your platform.
System Alerts
At the bottom of the page you can also attach a System Alerts template. This refers to any internal email alerts that have been created. Please select the relevant template from the drop down.

Save & Continue to progress to the next page.
Job Notes
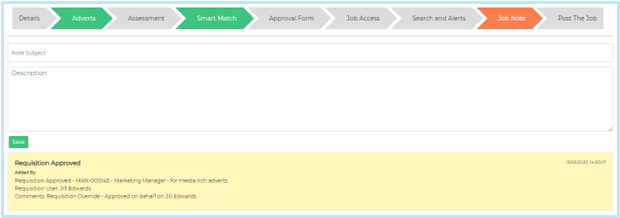
You can use page to add any relevant notes to the job.
If you use the vacancy approval feature this is also where you can see any notes relating to the approval process such as who has approved the role with a date and time stamp.
Post The Job
Job Status
This is the final step of creating a job. Here you can start the approval process, enable Job Alerts, choose which job boards to post to (if you use this functionality) and advertise your role using social media feeds (if used).
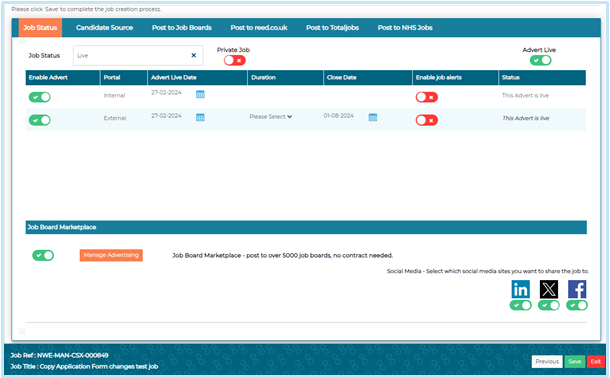
To make your job live
(if you do not use Job Approval functionality)
- Select Live from the Job Status drop-down
- Choose your preferred Close Date using either the drop-down options or the calendar icon
- Toggle Advert Open as required
- Use the toggle option to enable Job Alerts
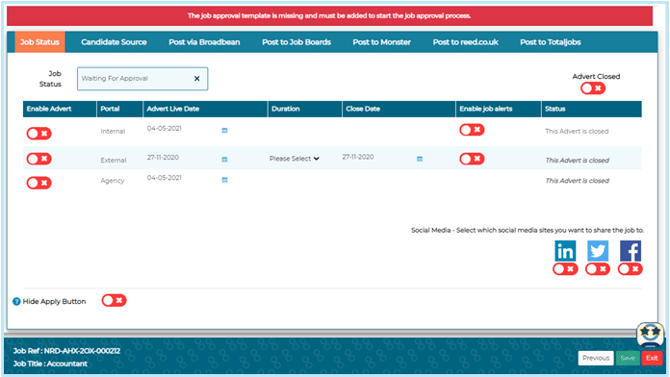
- You will not be able to change the job status. This will be set to Waiting for Approval until the job has been approved.
- Press Save on this page to trigger the email to the first approver, you will then get the below message onscreen to advise the job has been saved and the email to the first approver has been sent.
Job alerts will be sent to those candidates who have registered for alerts for criteria set in the searches and alerts page.
Press Save.
To make your job live
(if you use Job Approval functionality)
- You will not be able to change the job status. This will be set to Waiting for Approval until the job has been approved.
- Press Save on this page to trigger the email to the first approver, you will then get the below message onscreen to advise the job has been saved and the email to the first approver has been sent.

When the approval process is complete, the job status will automatically change to Approved. If you go back into the job, you will then be able to make then job live using the steps above.
If you have not selected an approval workflow you will get the below message onscreen and the Save button will be greyed out.
To rectify this, go back to the Approval Form page and add a Job Approval Workflow.
Posting on social media

To use this feature, you will need to set up an external RSS Feed account to connect the feed of jobs to your company’s LinkedIn, Twitter and Facebook accounts.
This will then post any selected role to your company social page(s) as a status update when you tick the appropriate box(es).
If you're unsure if this feature is set up in your solution, please contact your key superuser(s) or recruitment team.
Posting to other Job Boards
Jobtrain provides a posting to Job Boards feature – a time saving feature that allows you to post your adverts on various job boards including reed.co.uk, CV library etc.
If you're unsure if this feature is set up in your solution, please contact your key superuser(s) or recruitment team.
Hide Apply Key
|
Jobs can be advertised without the Apply Key to direct candidates to a different apply source by using the Hide Apply Key option.
If toggled on, candidates will be able to view the advert details, but will not be able to apply via the advert. This is useful if you’re advertising information about an open day or a graduate campaign that may open on a later date. |
|

Candidate Source
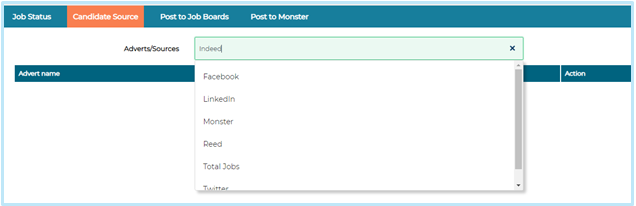
This feature allows you to restrict the answers a candidate can chose from when answering the question ‘Where did you hear about this vacancy’ for this job.
To do so simply select from the list which advert sources they should be able to select from.
If this section is left blank, then the candidate will be presented with the full list of advert sources to choose from.
Making changes to where a job is advertised
To change which portals the job is advertised on (external, internal or agency), once a job is live, this is done on the 'Post the Job' page using the Enable Advert toggles.
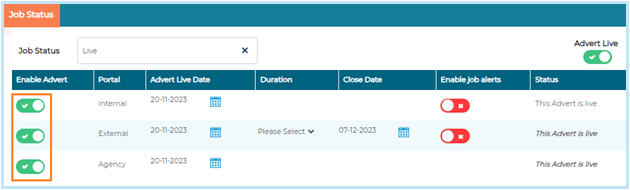
Please note disabling the toggles on the Advert Copy page will not prevent the job from displaying on the portal once it is live and advertised.
Closing Jobs
Jobs will automatically close once the job closing date has passed. The job will no longer be visible on the relevant candidate portals and any associated automated notifications will be sent.
Closing a job early
If a scenario arises where you need to close a job early, then this can be done by disabling the Advert Live toggle and clicking Save.
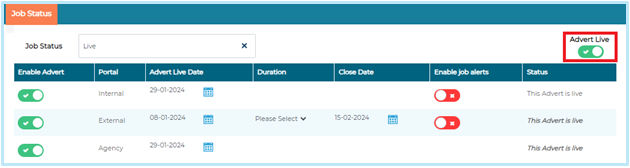
We recommend updating the job closing date when making these changes to ensure that any reports reflect the true closing date.
Once this is disabled the page will update to show the Advert as closed and the job will no longer be visible on the candidate portals or included in any of the standard job feeds (such as Indeed, Adzuna etc).
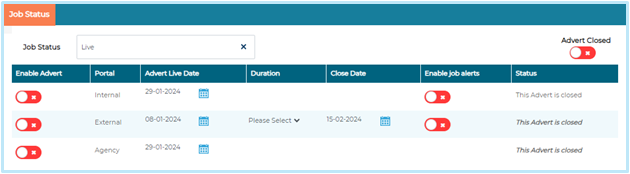
Please note: If you've advertised the role on job boards using the multi-posting feature or direct integrations like Reed/Total jobs, you must manually close the job advert on those boards. They will show the original closing date at the time of posting.
Will candidates be notified if a job has closed early?
Candidates do not receive automated emails once a job is closed. However, they will no longer receive reminders to complete their application if it remains incomplete.
If a job is closed early using the advert live toggle without changing the closing date, candidates with incomplete applications will see 'Closed Early' as the closing date on their 'My Jobs' page on the candidate site.
Creating a job template
To create a job template, follow the same steps you would do to create a job.
When you get to the Post the Job page, ensure Advert Closed is toggled off and instead of updating the job status to Live, change it Template instead.
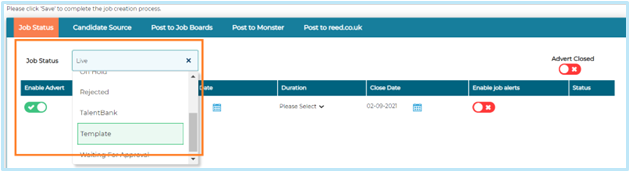
Save
Managing Job Templates
To view and amend job templates already set up on your site, go to Search > Search Jobs.
Select Template from the Job Status dropdown and then Search.
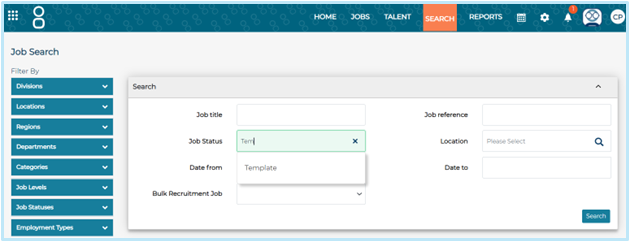
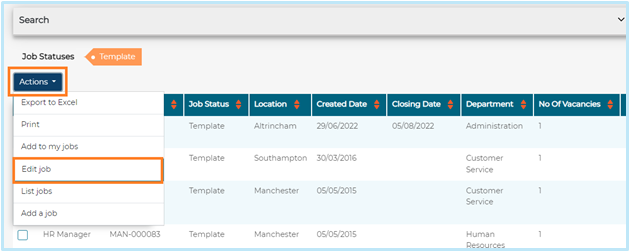
You will see a list of all job templates set up on your site.
To amend the job templates, select the relevant job template from the list. Using the Actions menu, select Edit Job.
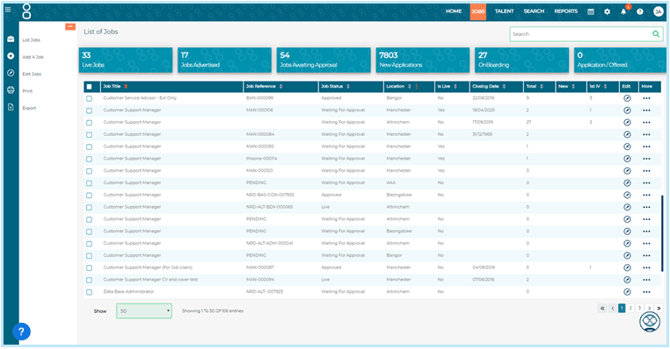
Jobs dashboard
The Jobs dashboard will display all live and current vacancies that you have been granted access to.
The Jobs dashboard includes several columns that give an insight into the job details and total number of applications. From this page you can:
- Add or edit a job
- Access all applications to a job
Don't worry if you are unable to see your job listed on this page, this page is designed to show jobs that are Live or going through the approval process.
To search for jobs at any other status, simply navigate to the Search page and select Search Jobs. This will allow you to search all jobs in the system using a variety of search criteria.
For example, if you start adding a job but dont complete the add a job process (such as sending the job for approval or making the job live), then you will be able to find this using the Search Job function.